Submitted by Sally Jenkins
Lacemakers Guild of Oklahoma
Summer 2010
| BOBBIN LACE SPIDER EARRINGS Submitted by Sally Jenkins Lacemakers Guild of Oklahoma Summer 2010 |
|
Download the complete pattern in PDF format HERE
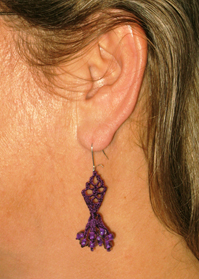
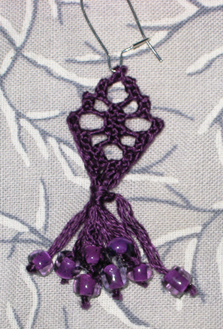
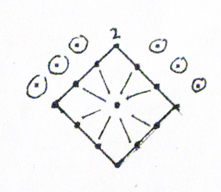
| Bobbin Lace Spider Earrings, simple directions Materials: 8 pairs of bobbins (or thread-extenders) 96" regular 6-ply embroidery floss (or more) in your choice of color 13 or more pins 16 beads (holes must accommodate 6-ply embroidery floss - I used #6 seed beads) super glue or craft glue (optional) 1 pair earring hooks 1 pattern bobbin lace pillow, or sturdy styrofoam block covered with cloth beading needle needle threader (optional) waxed paper (optional) If using thread-extenders, you can use as little as 6" of 3-ply thread per bobbin (12" per pair). Note, you will have cut your thread to 12" and then pulled it into 2 strands of 3 plies each. If using regular bobbins, it's better to double the length, and use 12" per bobbin (24" per pair). Embroidery floss is soft and is a bit more difficult to tension than tatting thread, but the color options are huge with embroidery floss so it's worth a little extra effort. Make a simple Spider motif. Weave down the sides as if finishing a bookmark or insertion. Bundle and tie the threads. Cut them off fairly long, at least 6" if possible. You will cut them back later. Now add the beads wherever you want them. I used a beading needle and a needle-threader and threaded two 3-ply threads, one at a time, onto the needle for a total of 6 plies per bead. Watch your threads so as to get 2 that are near each other in the bundle. Thread the beads and slide them up to the base of the diamond shape. Tie an overhand knot in the thread at the location you want the bead to be (it's helpful to use a straight pin to get the knot in the desired spot). Slip a sheet of wax paper under your work. Apply a dab of glue to the knot. Slide the bead down over the knot. Allow glue to dry. Trim off extra threads. Slip an earring hook through the top pinhole. Bask in the praise of your friends. |
 |